Good Morning! I'd like to introduce you to my Hubby, Michael, who just so happens to be renowned in our circle of friends and family to be the foremost authority on knife sharpening. Everyone we know (almost) has him sharpen their knives for them. Julia Child would no doubt refer to him as a megaloknifomat (Julia used that word in a letter to Avis DeVoto in 1953, referring to her own passion for the essential sharp-edged tool.). He is a product design engineer, and his meticulous care and sometimes exhausting attention to detail comes in handy for me, since I have the benefit of never having a dull knife. Without further adieu...A Comprehensive Guide to Sharpening Kitchen Knives, brought to you by Mr. Kitchen Joy.

Hello! Michael here. Nice to meet you. Since you're reading this, I can assume you enjoy my wife's blog from time to time. Her pictures may look good, but they do a complete injustice to the sweets and savors she has created on this adventure. For every splendid picture you've seen over the past year, I have been working hard behind the scenes. I have two jobs: eat all the food and keep the knives sharp.
A common saying we have all heard is “A dull knife is more dangerous than a sharp knife”... That's ridiculous. A sharp knife will cut both chicken and fingers (“save the liver”…if you haven’t seen the Julia Child SNL sketch, you must.) much more easily. Sharpening is an inherently dangerous activity, but in my opinion if you know how to dice or julienne, then you should know how to sharpen. Much like cooking, sharpening can be practiced to many degrees of perfection. Most kitchen drawers have at least one gizmo (usually a pull-through sharpener) that claims to sharpen knives. A pull-through sharpener does to a knife what a microwave does a Beef Wellington. In this post I will cover the selection of a good knife, the technicalities of an edge, and finally how to sharpen a knife.
I have always been interested in knives. Most of my experience is with pocket knives, but the general features of knives remain the same across all styles. In this post, I will focus on the technical details of knives (steel, edge geometry, and sharpening) instead of actual kitchen knife models. Knife selection is a personal choice and usually is largely dictated by cost. Very nice knives can be had for relatively little money but cost usually does at least allude to the quality of a knife. I recommend buying a few really good knives (2-3) for the same cost as you may be tempted to buy a decent block of 20 knives. You only are able to use one at a time after all. No matter the style, maker, or size, a knife's main purpose it to cut. Every knife's ability to become sharp and stay sharp is determined by two things: type of steel and edge geometry.
Steel:
Steel comes in as many varieties as there are wines. Just like wines are categorized as either white or red, there are two main families of steel: carbon and stainless. Carbon steel is different from stainless because it does not contain enough alloys (specifically chromium) to readily prevent corrosion (rust). Carbon steel is not for the casual user, but with a bit of extra care you are rewarded with a more sturdy steel (that strength can be used to sharpen to a thinner edge) that tends to resist edge deformation and breakage better than most stainless steels. If you are interested in hearing more about carbon steels, let me know in the comments, otherwise I could spend the next 10 paragraphs blabbering on about the virtues of carbon content and martensite structures. There are many carbon blade steels, some of the more popular for kitchen knives are 1095 (sometimes labeled as just “carbon steel”), 51200, 5160, O1, White Steel, Blue Steel, Super Blue, and many more. If it's carbon, it's usually not bad.
Stainless steel is most likely the material you will decide choose for your knives. Almost every knife, whether it is from the USA, China, Germany, or Japan will be made from one form of stainless or another. Though they may all resist rust, the quality of stainless steels vary wildly. Most cheap knives coming out of Asia are either unlabeled or simply labeled “stainless”. If a knife is less than $20 and fails to mention specifically what steel it contains, always assume it's made from Coca-Cola pop cans. Some knives do list a steel but it's vague; some examples are: 400 Series Stainless, German Stainless, High Carbon Stainless, etc. Assume these knives are made from Pepsi pop cans...
Some of the high quality stainless steels are: 440C (not to be confused with 440, 440A, or 440B), VG-10 (a very high quality stainless and one of my favorites), 154CM (Benchmade kitchen knives), X50CrMoV15 (found in Victorinox and Wusthof Classic knives). This is a very short list of some of the more popular steels, many more quality cutlery steels exist. If a steel is not listed, but the knife is reputable, it can usually be found on the manufacturer's website. Most any steel from Scandinavia (especially Sweden) is usually good. Don't assume even American-made knives are made from the finest of steels. Cutco has built a reputation around it's steel being “the best in the world”, however they use the same steel than many Chinese no-name knives are made of (440A). While heat-treat (of which Cutco does a good job) plays a large role in the quality of a blade, you will never achieve the level of quality of a better steel such as VG-10.

I'll save my extensive recommendations for specific knives for another post, but an excellent and affordable place to start would be the Victorinox Fibrox line:
Victorinox Swiss Army 8-Inch Fibrox Straight Edge Chef's Knife
Edge Geometry:
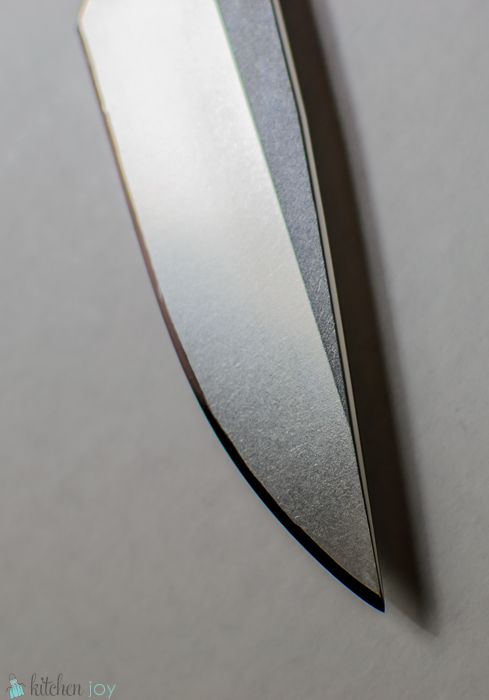
A knife with quality steel and quality heat treatment will be an expensive spatula if it does not have a correct edge geometry. Edge geometry is defined by two main factors: the angle of the edge and the thickness of the material behind the edge. The blade of a knife is made of three parts: the spine (top of the knife), the primary bevel (the main ground portion of the blade), and the secondary bevel (referred to here as the edge). You can't have your Apple Charlotte and eat it too: the smaller the angle and thinner the material behind the edge, the better slicer your knife will be. However the edge will be more delicate and when damaged more work will be required to repair it. While some Japanese knives have very acute edges at 10 degrees, they will chip and bend when cutting anything remotely tough, even crusty bread! A reasonable edge for knives not expected to contact bone is approximately 20-30 degrees. There is wide range in there, but edge angle is a personal choice and must match your cooking style. If a knife is appropriately thin (see below), then in general the taller an edge appears, the more acute the edge angle. However, don't be fooled by a thick blade, because this will also cause the edge to appear tall.
Edge angle can be fully modified by the person sharpening a knife, but the material behind an edge (edge thickness) will only increase as a knife is sharpened. As you sharpen a knife and remove material, the edge slowly “moves” up to the thicker portions of the bevel. A knife is considered worn out only after it has been sharpened so many times that it is too thick for its intended purpose. A knife with thin a thin edge must be selected while purchasing. Many quality knives (Victorinox Fibrox, Shun, etc.) have thin edges from the start, while edges tend to get thicker as price decreases. There are technical ways to measure edge thickness (usually using a caliper), but with a bit of experience you will be able to easily spot an edge that is too thick for your needs. If you have knives that are sharp, but don't slice well, it's most likely the knife has a thick edge.
Moving up from the edge, we see the primary bevel. The primary bevel affects the strength of the edge in that it must support any force applied without bending or chipping. There are two main primary bevel types: flat ground and hollow (or concave) ground. A flat ground blade is slightly stronger and tends to slice tall stiff objects like cheese a bit better. A hollow ground edge has more bevel metal ground away to form a thinner edge, this makes for a knife that is more efficient at cutting soft items like meat but may bind at the sharp joint that is created between the primary bevel and the flat of the spine when slicing cheeses or hard vegetables.

Sharpening:
A knife with decent steel and appropriate edge geometry must be maintained to operate at its full potential. There are many techniques to sharpen a knife, some are powered and some feature interesting jigs and clamps. I choose to sharpen freehand on stones: it's been the method of choice for thousands of years and grants complete flexibility on the shape and quality of any edge desired. With stones I can put a stout edge on a cleaver or a very fine and polished edge on a slicer. How I hold the knife and what stone I draw it across is completely determined by how that knife is used. Before we start sharpening, we are going to want to pick up a few stones...
What to buy:
I have boxes of sharpening stones, but tend to use only a few of them. Though I enjoy using traditional whetstones and tend to haul them out for heavy re-profiling jobs, I will talk about the modern stones here that are easier to maintain and faster to use. Two materials have revolutionized hand sharpening: diamonds and ceramic. Sharpening is the act of removing and polishing metal, in order to do that you must use a material that is harder than the metal itself. Knife steels are very hard, the traditional stones are also hard but diamonds and ceramic are MUCH harder. Like sandpaper, sharpening stones are rated by grit size. The higher a grit number, the more fine the surface of the stone. Below are a few recommendations of where to start if you decide to purchase your own sharpening stones. These stones are listed in order from coarse to fine:
Coarse Diamond Stones:

These diamond stones are not high quality, and will wear out after a lot of use. Having said that I am very pleased with their performance and will continue to use these stones exclusively for coarse diamond sharpening. It claims to be Medium/Fine but is closer to Coarse/Medium: DIAMOND SHARPENING STONE - hone block - 2" x 6" double sided FINE + MEDIUM

This stone will work faster and last longer than the option above: DMT D8C 8-Inch Dia-Sharp Continuous Diamond Coarse

If you choose to go a more traditional route (you must use oil or water when sharpening), I highly recommend the Norton Indian Stone (good coarse and medium grits): Norton 614636855653 IB8 1-by-2-by-8-Inch Fine/Coarse India Combination Oilstone, Red
Medium Ceramic Stones:

Sticks work great for cleaning up a slightly dulled edge. Acts like a sharpening steel on steroids and works well as a bridge between a coarse diamond stone and fine ceramic stone: Lansky 8" Ceramic Sharp Stick

Spyderco ceramic benchstones are the standard for quality and durable sharpening stones:
Spyderco Benchstone - Medium 2" X 8" w/Box
Fine Polishing Stone:

I bought the Spyderco Fine Ceramic Stone after a few years of frustration. It will never wear out and sits in that perfect grit range of polishing quickly but still leaving a fine sharp edge as a finishing stone. I would be doing you a disservice to recommend anything else:
Spyderco Fine Benchstone with Box, 2 X 8 -Inch


How to tell if it is time to sharpen:
A safe method to see if a knife is dull is to look at the edge at a slight angle under a bright light. If any of the edge has deformed, it will show up as a shiny, reflective line. An edge that remains sharp will not reflect any light. The wider the line, the more deformed the edge.

Sharpening doesn't always follow the same steps. A heavily abused edge will begin with coarse diamonds. An edge that is just starting to dull (the best time to sharpen) or one that needs to be very sharp for a specific job (i.e. cutting meat into thin strips) may only need the medium ceramic rod or a few passes on the fine stone. Determining where to start in your stone repertoire will take some practice. Some advice I can give is start one level more coarse than you think you need. With practice (and a few Band-Aids) a sharp edge can be felt by apply light pressure and slight movement with your thumb. A sharp will grab and feel “sticky” while a dull edge will not bite. Until you’ve developed some expertise, stick with the light test mentioned above.
How to sharpen:
The method of sharpening I will describe here is my own. There are many methods and I encourage you to experiment and find what works best for you. The most important thing to keep in mind is that an edge must be completely sharpened by one grit before you move onto a finer grit! If you have dull spots on a blade, don't move on from the diamond stones until both faces of your edge have met each other. The diamond stones are designed to remove metal, the ceramic stones are designed to polish your edge and remove the scratches the diamonds made. If you do not remove enough metal on the coarse stone, all you will do with the finer stones is polish the sides of the edge and leave the cutting edge as dull as when you started.

If you are right handed, hold the knife you are sharpening in your right hand. If you are left handed you should see a doctor. The sharpening stone is either held in your other hand (this is the method I prefer) or set on non-slip pad on a sturdy work surface. To sharpen, run the knife (edge leading) along the stone as if you are slicing off a thin layer. As you pass the knife along the stone, it is critical to maintain the same angle throughout each stroke (remember: more acute angles are sharper but not as durable) and each grit of the sharpening cycle.
If you are unable to maintain a constant angle, try sharpening on the coarse grit at a more acute angle than the medium and fine grits. Remember that your edge angle is the combination of both faces of the edge. If you want a 30 degree edge, you must sharpen with the knife at 15 degrees to the stone (a 1.5” tall blade with be sharpened with the spine ⅜” off the stone). With each stroke, sharpen different parts of the edge along the length of the blade. I like to start at the tip and slowly push the knife forward with each stroke. In 3-4 strokes every part of the edge will have touched the stone. Count your strokes and remember to keep switching which side of the edge you are sharpening. It is important for an even edge to sharpen both sides equally. I like to perform 10 strokes away from me then 10 strokes towards. After 30-40 strokes I will check the progress of the edge to see if it is time to switch grits. Remember: only move to a finer grit after the edge is completely sharpened on the current grit.
Light to moderate pressure should be applied throughout sharpening until the last couple of strokes which should be applied lightly. The goal is to remove and polish metal, not cause your perfect edge to bend due to too much pressure. If you feel you are not making much progress at a certain grit level, it is most likely because you moved forward too quickly. If a knife does not become sharp after 20-30 strokes on your fine stone, don't be afraid to move back to your medium or even coarse stone. At any grit level (even coarse) a knife should be able to slice a piece of printer paper held in the air without causing it to tear.
The angle you decide to sharpen at can be modified at any time (see below for re-profiling to a more acute angle). The harder your steel, the better it will keep a very fine edge.

Reprofiling an edge:
When a knife is brand new, the angle has been set by the factory and will most likely not match the angle you intend to sharpen at.
If the factory angle is more acute than what you intend to sharpen at: you're in luck! You can apply what is called a “micro-bevel” to the edge. A micro-bevel occurs when an edge is sharpened at it's very end at a more obtuse angle than the secondary bevel that makes up the edge. For the first 3-4 sharpening, you will be able to use only the medium and fine grit stones to quickly gain a sharp edge. After the factory edge is sharpened away, the knife now carries your unique angle and can be sharpened normally. Micro-bevels can be applied to any edge. If you sharpen a knife at a more acute angle than normal, you can quickly and easily maintain a sharp edge by using a micro-bevel at a more obtuse angle.
If the factory angle is more obtuse than what you intend to sharpen at: you must reprofile the edge. Reprofiling is done with the coarsest stone you own and works best if done with diamonds. Sharpen as you would normally, but taking as many strokes as required on the coarse stone until both faces of the edge have met. Be careful not to press too hard on diamonds stones, this will break the individual diamonds from their bonding agent and cause your stone to loose effectiveness. A neat trick to see the progress of your work is called the marker trick (this can be used during normal sharpening as well): Using a black marker, color the entire edge of the knife you are sharpening. When you begin reprofiling, the marker will wear away at the top of the edge. As you make progress you should continue to re-color the edge until a few strokes removes all of the marker, this will guarantee that both faces of the edge have met at your new sharpening angle. Don't be afraid to spend a couple more minutes on the stone to make sure you have completely reprofiled the edge.


Maintain the edge:
It is far easier to maintain an edge with regular sharpening than waiting until you need to use the diamonds to recover a destroyed edge. I like to sharpen as soon as a knife's performance begins to drop. This may take only a few passes on a medium ceramic rod. All diamond and ceramic stones can be cleaned with Barkeeper's Friend or Comet Cleanser. A dirty stone (especially white ceramic) will appear gray and shiny. I clean ceramic stones after 2-3 sharpenings. Knives should always be stored with the edges protected and never put in the dishwasher to mosh with the rest of the silverware. I recommend a magnetic strip to keep your edges from damage, or a blade cover if you wish to keep them in a drawer. Cutting boards should always be made from a non-abrasive material softer than the knife. Plastic is best, and wood will work. Glass cutting boards are kryptonite to knives!
I guarantee that sharpening will be frustrating when you begin, however the first time you achieve a truly sharp edge you will finally see what all the fuss is about.
*Note: All views and opinions expressed are our own. We do not receive any form of compensation for the opinions in this post. We have come to love these items organically, and none of the companies mentioned even know we exist.
The Amazon affiliate links featured in this post help to support this website. Thank you!!
Robin Peters
Wow! God Bless you for sharing this tremendous wealth of knowldge based on expertise. I will refer to this again and again.
I will appreciate the stones left several generations ago in cutlery drawers by my relatives.
I will sneer a bit at my Cutco knives, although I am not ashamed to send them for annual sharpening. I love their tomato slicing knife.
Now I'll share one of my secrets.I regularly attend estate sales, my first order of business is to go directly to the gadget kitchen drawers. I am rarely disappointed. Here I search for two things, quality and thin blades, quality for general use and thin for my Halloween pumpkin carving.
Thanks for this great post! Your pay will be your required eating.
And now I'll schedule that doctors appointment to see what can be done about my left-handedness.
Have a delightful day!
I'll be excited to follow this adventurous year ahead.
mandyjoy
Some of our favorite knives have a bit of history to them also. I bet you have some great finds!
bakeritalia
I throughly enjoyed reading this post, thank you Michael for stopping by with your wealth of knowledge. When I teach classes one of the number one problems with people saying they hate cooking is not that they hate cooking, they just have horrible knives! Great read as always.
Pat McGovern
I love tools and good knives are essential in the kitchen, shop or field. What a great article to learn how to understand edges so you can keep them sharp!
shahrin
Thank you for this great and in depth review of the knife and sharpening.I agree with the informaticist. Learn how to sharpen your knives by hand properly and do it as little as possible.Electric sharpeners take off a ton of metal and high temperature the cutting edge. Most knives don’t need to be sharpened, they recently require the burr straightened with a couple of licks of a steel.I think its extensive yet in the meantime truly straightforward and find the Knife that best fits your needs.Just wanted to say that I really like this guide.
Brian
At 10 years old I asked my grandpa for a knife, he gave me an old pocket knife and I started whittling away at wood. When it dulled I asked him to sharpen it and was told, "its not my knife anymore, its your job to sharpen it". He taught me to hone a knife the same way you are telling others to do. It takes a little time to get it right but once you are able to do it, you never forget it. P.S., at 12 yrs old I was sharpening hunting knives for other people
, I am 56 and still get asked to sharpen a knife from time to time.
Billlawler@comcasi.net
This is for Michael. You are spot on on sharpening technique. The data you are missing is. 440 is governed my ASTM and AISI guide lines. I do not expect you to be a metallurgist . I'm not one either. I have spent more than 40 years in the metals and plastic industry. My observation is condition is noted after the 440 . 440 designate chemical of the metal and condition designates heat treatment to designated hardness. Most all manufactures buy condition A annealed . It's very soft and workable . They make whatever and heat treat to condition C . The temperature and cooling temperature will determine hardness .
Michael
Hello Bill, thanks for your response. I too am not a metallurgist, and my experience working with metals is less than half of yours. I believe we both agree that the A, B, and C designations usually refer to the hardness of the 440 steel after heat treat. The letter designations do also refer to the chemical makeup of the steel though, they signify how much carbon is added to the steel. 440A has a carbon content of 0.65% to 0.75%. 440B has a carbon content of 0.75% to 0.95%. 440C has a carbon content of 0.95% to 1.2%.
The carbon content of the metal affects the MAXIMUM attainable hardness (and transversely affects the rust resistance of the metal, 440A being the most rust resistant). All three steel types address here CAN be hardened to the same hardness of say 45 Rockwell C, however only 440C has enough carbon content to obtain the higher hardness of 58-60 Rockwell C to be considered an excellent cutlery steel.
So while the letter designation of the 440 series does tend to relate directly to the end hardness of the steel, it actually only refers to the carbon content (and therefore “hardenability”) of the steel.
amr64
Hi Michael,
Very well written blog covering all the fundamentals of metallurgy, stones and technique. Especially the tips that are coming out of a large repository of practical experience - no book can give such detail.
Thanks very much
Rachel
This left-handed person thanks you for the tutorial!