Welcome to Pressure Cooker Basics Part 1. This is the first in a four-part series about using a pressure cooker. Over the next few weeks I'll be sharing my favorite go-to uses for my pressure cooker, some tips for adapting other recipes for use with a pressure cooker, additional functions of pressure cookers, and how to care for your pressure cooker.

So you scored a shiny new pressure cooker…now what? I’ve had my Instant Pot Pressure Cooker for almost 2 years now, and I absolutely love it. I’m here to help you get used to how it functions so you can start using it right away to make your life easier and more delicious.
I can only speak to the specific functions of the Instant Pot because that is what I have. Most other brands have similar functions, although the buttons might vary a bit. I did a lot of research before I bought mine, and I have absolutely no regrets.
For my first post about Pressure Cooking, I’m going to introduce you to the basic recipes that I use the most. The everyday go-to uses that help set me up for a simpler week. We’ll be talking about steamed vegetables, chicken breasts, homemade chicken stock, and hard-boiled eggs.
This post contains affiliate links, which means that if you make a purchase through one of the product links, Kitchen Joy® may receive compensation.
Once you have the Instant Pot pressure cooker, you don’t really need a lot of other accessories or add-on items in order to embrace its full capabilities. I do however recommend having a steamer basket, which are very inexpensive if you don’t already have one. (Any collapsible steamer basket will do, you don’t need a special one that is made for pressure cookers. I have this one). Another item, although optional and not absolutely necessary is the Glass Lid
. This could be a worthwhile investment especially if you intend to use the slow-cooker function on a regular basis, or if you plan to serve directly from the pressure cooker. You can use the slow cooker function with the lid that comes on the Instant Pot, but you just need to make sure that you don’t seal/latch it all the way. Just lay it on top.
Liquid: Pressure cookers require liquid in order to function properly. You must add AT LEAST one cup of liquid to the pot every time you cook something. It does not have to be water. Stock, juice, etc. work really well too.
To set the cook time: When using the pressure cooker for a specific amount of time, you’ll be using the ‘manual’ mode. To do this, you’ll simply press the ‘manual’ button and then use the +/- buttons to select the desired number of minutes.
High pressure vs. Low pressure: To switch between high and low pressure, simply press the ‘pressure’ button. (I only use low pressure when cooking eggs.)
Quick release vs. Natural release: How they work and when to use them-
The first thing you need to know is how to do quick-release on the Instant Pot pressure cooker. At the end of the cooking time, you will need to press ‘cancel’ to turn off the ‘keep warm’ function that automatically engages. Then you will need to very carefully turn the release valve on the top of the lid. Keep your fingers off to the side when turning the lever. The steam will come blasting straight up from the valve. Protect your hand with a kitchen towel and be sure to keep your head back so you don’t get blasted in the face. Once the steam has released and the pressure has gone down, the little silver peg to the right of the pressure valve will make a clicking sound and it will drop down. You will now be able to remove the lid. Quick release is used in recipes with a very specific cooking time, like vegetables, fish, etc. Use whichever method the recipe calls for.
Natural-release is used in recipes with a more relaxed cooking time, allowing for additional absorption of flavor. Natural-release works well in recipes for meats, roasts, stews, etc. Natural-release takes 10 minutes or so. To do a natural-release all you need to do is press ‘cancel’ to stop the ‘keep warm’ function and then wait for the pressure to gradually release. You’ll hear the little click that signals the dropping of the silver peg near the pressure release valve and you’ll know that you can open the lid. Again, use whichever method the recipe calls for.
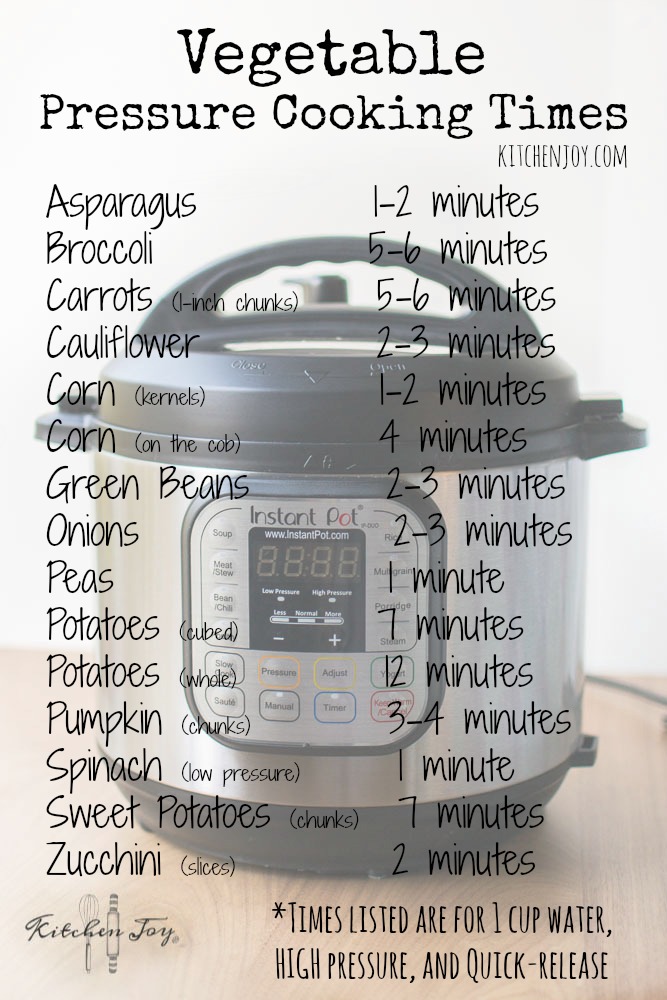
Steamed Vegetables:
I make a ton of steamed vegetables these days because I make my daughter’s baby food. The Instant Pot makes it SO easy! Not to mention how quickly I can make mashed potatoes. You’ll fall in love with it in no time.
You will need: Vegetable of your choice, steamer basket, 1 cup water.
Note: Cook times will vary by what type and size of vegetable you are using. SEE CHART BELOW.
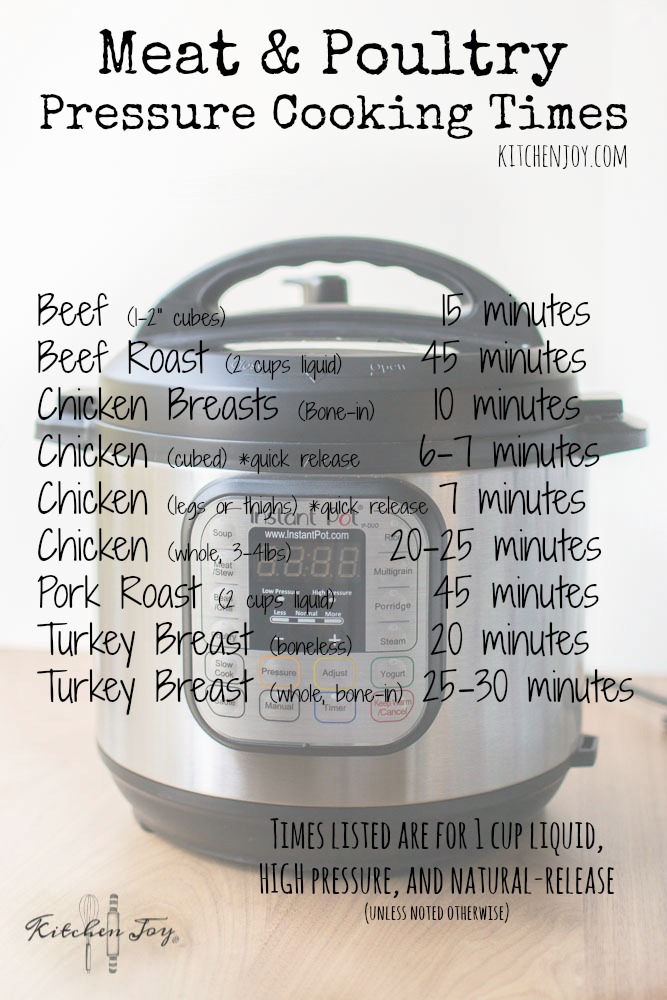
Chicken Breasts: Bone-in vs. Boneless
This is a great way to prepare for the week’s meals, especially if you buy the family-size value packages of chicken. Cooked chicken keeps longer in the fridge than uncooked anyway, so it’s a win-win. The cook time will vary if you are using bone-in or boneless. See chart below for cooking times. If you are using bone-in, keep reading to see how to make homemade stock with the leftover bones.
You will need: Chicken, liquid (either water or chicken stock/broth)
*Note: The times listed below are for fresh/thawed chicken. If you are using frozen chicken breasts, just increase the cooking time to about 25 minutes. Keep in mind that it will take longer to get up to pressure when starting from frozen. It works well though!
Chicken Stock:
Homemade chicken stock is so quick and easy to make in the pressure cooker. It isn’t difficult on the stove, but it can be quite time-consuming. The pressure cooker delivers an incredible flavor that beats store-bought in less than an hour. It’s also a great way to use up leftover veggies and chicken scraps. You can use pretty much whatever kind of chicken that you want. You could even use the leftover chicken carcass from one of those rotisserie chickens from the grocery store. Another great option is buying a few pounds of chicken wings. They’re a really inexpensive way to make a batch of stock if you don’t already have chicken on hand.
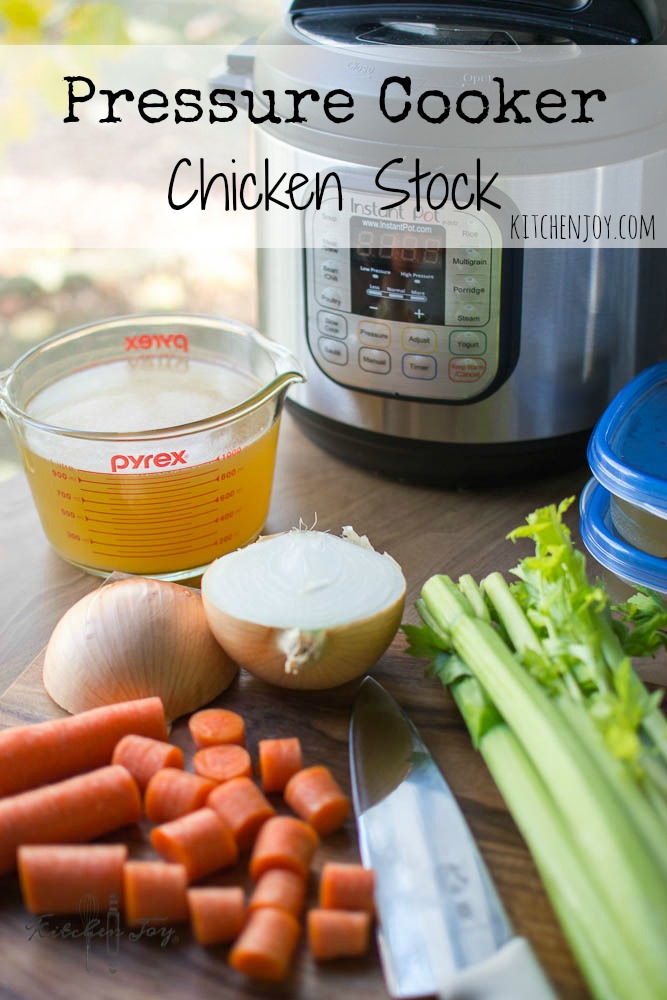
Pressure Cooker Chicken Stock
- Cook Time: 30 minutes
- Total Time: 1 hour
- Yield: About 8 cups 1x
Ingredients
- 3-4 lbs. chicken pieces, bone-in
- 2-3 stalks celery, roughly chopped
- 2-3 carrots, roughly chopped
- 1 large onion, chopped
- 2 cloves garlic
- 1 teaspoon salt
- ½ teaspoon pepper
- 1 bay leaf
Instructions
- Add all ingredients to pressure cooker pot. Top with enough water to cover the ingredients by about an inch, being careful not to pass the ‘max. volume’ mark on the pot.
- Set pressure cooker to HIGH pressure for 120 minutes, followed by natural release. (You can do as little as 30 minutes, but the longer amount of time yields much more flavor from the bones.)
- After pressure has released, pour stock through a fine-mesh sieve into containers. Cover and refrigerate several hours or overnight. Once chilled, skim the fat layer from the top before using the stock or freezing it for later use.
Notes
This recipe originally appeared on Kitchen Joy®.
Hard-boiled eggs:
Making hard-boiled eggs can be a bit annoying, especially when it comes time to peel them. The pressure cooker makes this task SO much easier! You can whip up a big batch of eggs for deviled eggs or egg salad without wanting to mutter under your breath.
Directions:
Place eggs on rack or in a steamer basket in pressure cooker pot. Add 1 cup of cold water. Set pressure to HIGH with a 2 minute cook time. At the end of the cooking time, allow the pressure to release naturally and then run eggs under cool water before peeling. (This is my go-to method.)
Alternatively, you could use HIGH pressure for 5 minutes instead followed by 5 minutes natural pressure release, and then a 5 minute ice bath. The texture of the whites is a bit tougher via this method in my opinion, however it is a very popular way to do it.
Thanks so much for visiting my site! I hope you have a great time playing with your pressure cooker. Be sure to stop by next week for Part 2!
![]()
Shelley w.
Hi thanks for the great post!! When you are cooking chicken does the cooking time go with thawed chicken or frozen chicken? Or does it matter thanks!!
Mandy
Great question! The times listed here are for fresh/thawed chicken. To use frozen chicken breasts, you'll need to increase the cooking time to about 25 minutes, and keep in mind that it will take a bit longer to get up to pressure when cooking from frozen. It works well though!