Sunday is for sushi. Or at least at our house it is. For the past several months we have had weekly sushi-making nights as a family for a few reasons. First, because sushi is my 3-year-old daughter's FAVORITE food since the day she first tried it at 7 months old on my husband's birthday. Second, because taking the aforementioned toddler and her endless hunger out for sushi is a financial investment that this blog cannot yet support. Third, because we love the challenge of recreating our favorite restaurant meals at home. And fourth, because I know many of you would also love to know how to make perfectly sticky homemade sushi rice at home!
I've done all the trial-and-error and testing for you so you can just jump in and have fun! I've also tried several brands of the necessary ingredients and I've got some favorites to share with you as well.

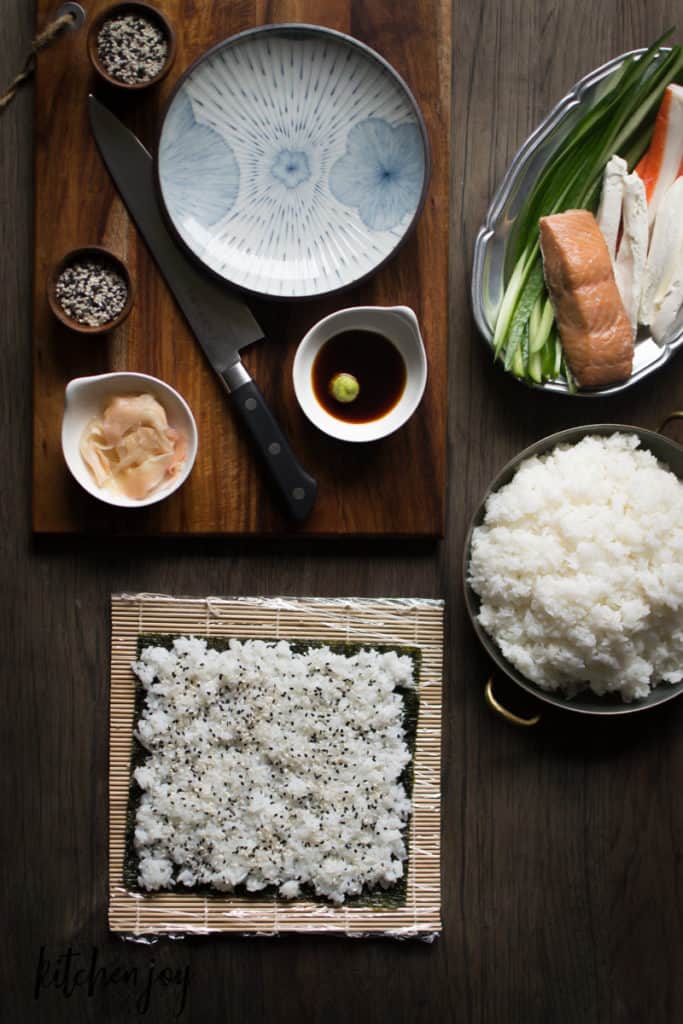
Okay, first thing first. What is sushi rice made of? Well, the obvious answer is rice, but making rice that is suitable for sushi requires a few specific ingredients and techniques to turn out perfectly.
- The rice. It is very important to use the correct type of rice. Sushi rice is a medium grain rice. My favorite brand that I've tried is Nishiki and it is quite easy to find in well-stocked supermarkets as well as on Amazon.
- The vinegar. Ever wondered how sushi rice gets that sticky texture that has a subtle sweetness to it? It's the sushi vinegar. While there are many varieties of seasoned sushi vinegar available to buy, our family's findings were that we greatly prefer making it ourselves. Most of the brands that we bought were either too sweet, too acidic, or just not very tasty. You'd be amazed how much you can tell the difference between them when you're tasting the rice on its own. (Don't worry, it's super simple and takes one minute to prepare your own seasoned sushi vinegar while the rice is cooking.) After all of my trials, I found that I like to use Trader Joe's brand of unseasoned rice vinegar and season it myself, although any brand of unseasoned rice vinegar will do.
- The rinsing process. It's very important to follow a few simple steps to ensure that your sushi rice will hold together properly and taste great too. The first is to rinse the rice very, very thoroughly before cooking. Using a fine mesh sieve, rinse the sushi rice for a few minutes until water runs clear. Be sure to stir the rice around while rinsing.
- The cooling process. Another very important step is tossing the cooked rice with the vinegar and then allowing it to cool. By piling the hot rice onto a large sheet pan right away and then drizzling with the seasoned vinegar, you are seasoning the rice and also allowing the moisture to evaporate from the rice which helps it to be nice and sticky for assembling beautiful sushi rolls.

How to Make Perfectly Sticky Homemade Sushi Rice
Homemade sushi rice can be made in a couple of different ways. My testing included both stove top and electric rice cooker (actually my Instant Pot using the rice function). While either method works fine, I found the texture to be preferable when made in the Instant Pot using the rice function.
PrintHomemade Sushi Rice + Sushi Vinegar

Perfectly sticky Homemade Sushi Rice is easily made at home when you follow these simple techniques. This recipe can be made in an electric rice cooker, Instant Pot, or on the stovetop.
- Prep Time: 5
- Cook Time: 30
- Total Time: 35 minutes
- Cuisine: Sushi
Ingredients
- 3 cups sushi rice, rinsed thoroughly
- 3 cups water
- ½ cup unseasoned rice vinegar
- 2 tablespoons granulated sugar
- 2 teaspoons Kosher salt
Instructions
- Measure the sushi rice into a fine mesh sieve and rinse under cold water for several minutes, tossing and stirring the rice until water runs clear. Do not skip this step as it is important for helping the rice to be sticky.
- Combine the rinsed rice and the water in the pot of a rice cooker or Instant Pot pressure cooker. Seal lid and cook according to the cooker's rice settings. Let rest 10 minutes before opening lid. If using stovetop- Combine rinsed rice and water in a saucepan and bring to a boil. Cover and reduce heat to low, cooking for 20 minutes. Turn off heat and let rest 10 minutes.
- While rice is cooking, prepare the vinegar. In a small saucepan, combine rice vinegar, sugar, and salt. Heat over medium-low heat until sugar and salt have dissolved, about 1 minute. Set aside.
- Transfer the rested rice to a large rimmed baking sheet. Drizzle ⅔ of the vinegar mixture over the rice and gently turn rice until coated. Using a silicone spatula or a rice paddle works well for this. Once rice is coated thoroughly, taste and add more vinegar as desired. Spread rice out in the pan and let cool to room temperature before using to make sushi rolls.
- Enjoy!
Notes
This recipe yields enough rice for 5 generous sized sushi rolls.

Stay tuned for my next post which will break down how to assemble a Homemade Sushi Roll including all the little tips, tricks, and tools that we use in our home for Sushi Sundays. I'd love for you to subscribe so you never miss a post!
Thank you for supporting my small business. As an Amazon Associate I earn from qualifying purchases.
Stay in touch! I'd love to hear from you via the contact form on this site, or find me on Instagram (@kitchenjoy) or Facebook (fb.com/kitchenjoyblog).
Comments
No Comments